Header Functions
The function buttons on the top right corner allow you to access the Notification Center, switch between Dalet apps, add UDOs or upload assets, and view or edit your profile information.
Viewing your Notifications
You can access your Notifications by clicking the button containing the bell icon
![]() at the top right. The Notification Center
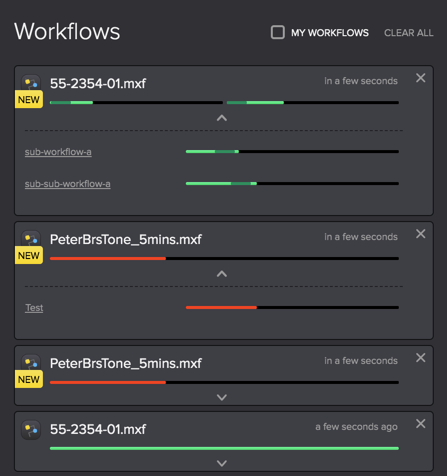
centralizes all important notifications, providing high level information about current workflows and allows
quick navigation from any notification to the Operations Dashboard. You will receive notifications when a
workflow begins to run, has failed, has been cancelled, or has been completed.
at the top right. The Notification Center
centralizes all important notifications, providing high level information about current workflows and allows
quick navigation from any notification to the Operations Dashboard. You will receive notifications when a
workflow begins to run, has failed, has been cancelled, or has been completed.
To view workflow notifications:
- New or unread notifications will be indicated by a circle icon overlay on the top right corner of the notifications button
 .
. - Click the it to reveal the notifications panel.
- Tick the My Workflows checkbox to only receive notifications about your own workflows.
- Clear the notification panel by clicking CLEAR ALL.
To manage failed workflows:
-
Expand the notification card by clicking
 to view the progress of each stage of your workflow. If your workflow has failed, you will be able to see where it happened.
-
You can hover over a failed workflow to view some details, such as workflow ID, owner, start date, and error. For further details, click the workflow to go to the Operations Dashboard.
-
If more than five workflows have failed over the last week you will see a summary card. Click the Investigate button to go to Operations Dashboard.

-
When you log in to FlexMAM, you will only be able to view notifications concerning failed workflows that are no older than a week.
-
Notifications concerning failed workflows received while you are logged in will remain in the notification center for a week, while those regarding completed or cancelled workflows will only remain for an hour.
To view task notifications
When there is a new task, an icon overlay will appear over the bell icon, similar to workflow notifications indicating a there is a new task. When there are new tasks in the pool, you can manage them within FlexMAM. You can learn more about tasks here.
Once you have opened the notification panel, you can toggle between tasks and workflows. Clicking the task panel will show you a list of tasks, in order of created time. Tasks are sorted into two categories Available Tasks and My Tasks. New tasks will be indicated by a NEW label. Here you can perform the following actions by hovering over a task:
- Start task: this will start the task and assign it to you. This means that the task will disappear from the Available tasks menu and appear in My tasks.
- Take: you can claim a task without starting it. This will move the task from the Available tasks menu and appear in My tasks without starting it.
Once you click Start Task, it will open a window that allows you to Do this task. In this window you can fill out the metadata form and make any edits you wish. From here you can perform the following actions:
- Return task: returns the tasks to the Available task pool
- Pause task: pauses the task. This task will stay in your task pool and you can Resume it at any time.
- Finish task: Once you finish the task it will disappear from your task pool.
If you navigate away from the notifications panel or log out, FlexMAM will remember where you last left off, and will stay toggled to Available Tasks or My Tasks next time you access your tasks.
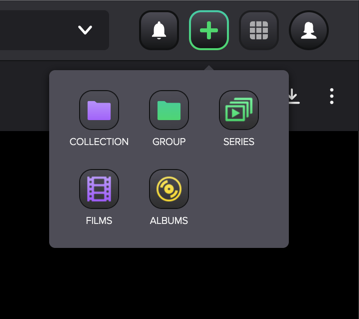
Using the Add Button
Click the ![]() button to open a menu that allows you to create/add a
new collection, create new Groups, create Image/Video Placeholders, create new root UDOs, and upload assets via
FlexMOVE.
button to open a menu that allows you to create/add a
new collection, create new Groups, create Image/Video Placeholders, create new root UDOs, and upload assets via
FlexMOVE.
Switching between Apps
Click the app switcher button ![]() on the top right. Here you
can access all the Dalet apps associated with your account or organization. You can use the app switcher to
launch between different Dalet Flex apps, e.g.: Dalet Flex Enterprise, FlexTRACK,
FlexMOVE, FlexREVIEW, etc.
on the top right. Here you
can access all the Dalet apps associated with your account or organization. You can use the app switcher to
launch between different Dalet Flex apps, e.g.: Dalet Flex Enterprise, FlexTRACK,
FlexMOVE, FlexREVIEW, etc.

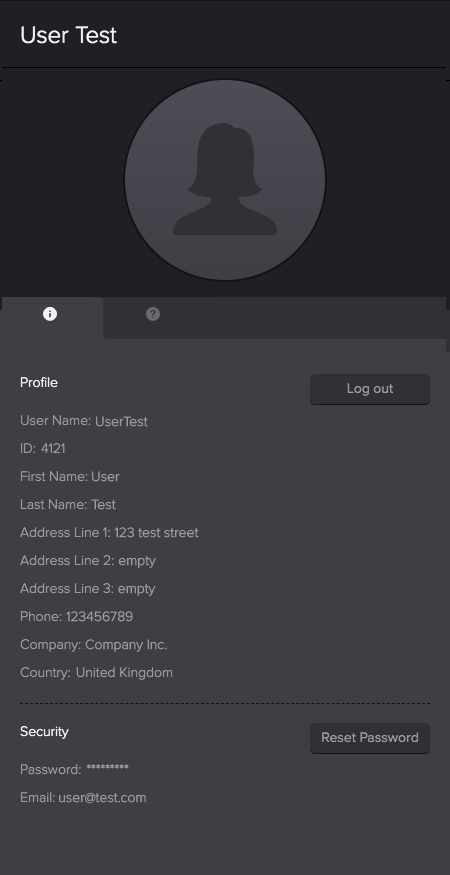
Managing your Profile
In the top right hand corner, you will find the profile icon button. It will either appear as
![]() or a previously configured profile picture. Here you can
log out with the Log out button, reset your password with the Reset Password button, and view and edit
your profile information. All the details you see here should correspond to your profile information in
Dalet Flex Enterprise, and any changes you make here will be reflected in your profile information in
Dalet Flex Enterprise and vice versa.
or a previously configured profile picture. Here you can
log out with the Log out button, reset your password with the Reset Password button, and view and edit
your profile information. All the details you see here should correspond to your profile information in
Dalet Flex Enterprise, and any changes you make here will be reflected in your profile information in
Dalet Flex Enterprise and vice versa.
To view and edit your profile information:
- Click on the profile icon
 or your profile photo, if you have previously set one in Dalet Flex Enterprise.
 - The first thing you will see is your profile image, your User Name, and ID. Your user name and ID cannot be edited
- To change your profile image, click Upload Picture.
- The following can all be edited by clicking the on the respective fields:
- First Name & Last Name
- Address
- Phone
- Company
- Country
- Once you are happy with your edits, click the checkmark or hit Enter on your keyboard to save it.
- Under Security, you can click the Reset Password button to reset your password.
- To close the panel, simply click the profile icon again or anywhere else on the page.
To check your system versions
- Click the tab marked with the
 icon.
icon. - Here you can check your versions for Flex Core, FlexMAM, FlexREVIEW, and the FlexTRACK.