Application usage of Flex APIs (via OAuth2)
Users registered directly with Flex (i.e. not via an external authentication provider such as SAML) can use Basic authentication with their username and password to perform ad-hoc queries against the Flex Media Platform APIs.
For more complex use-cases, such as external application usage of the Flex Media Platform APIs, authentication may be performed via JWT OAuth2 access tokens. (This is an implementation of the OAuth2 Client Credentials grant; see https://www.oauth.com/oauth2-servers/access-tokens/client-credentials/).
The overall process is as follows:
- Register an application for API access (using the Authentication service API directly; this is a one-off call).
- Use the application credentials (client ID and secret) returned from step (1) to generate a JWT OAuth2 access token (using the Authentication service API directly; tokens last 1 hr so this will need to be renewed regularly).
- Use the JWT OAuth2 access token returned from step (2) as a Bearer token for calls to the main Flex API.
Note that, at the time of writing, this approach generates access tokens which can be used to act as any user, including the super user. Therefore (for the avoidance of doubt):
- It must only be used for B2B API calls (between backend services).
- It must NOT be used in a web app (where the credentials could be intercepted).
- It can only be used in a single-tenant environment (i.e. where an individual customer owns the whole environment).
1. Registering an Application with the Authentication Service
To be able to register an application, you first need to know the system’s application registration key. This is stored
as a KV in Consul, with the following path: /flex/shared/authentication/oAuth/appRegistrationKey. Please ask your
system administrator to provide you with the value.
Then you need to send a request to the Authentication service - not the main Flex API - as follows.
URI:
(POST) http://<authentication-service-host>:18101/api/authentication/applications
Header:
X-App-Registration-Key: <application registration key, as described above>
Body (JSON):
{
    "applicationName": "<name of the application>",
    "description": "<description of the application>"
}
Example response:
{
    "id": 1,
    "clientId": "adeb7050-5f0d-4d44-b67a-5df7973968df",
    "clientSecret": "Nb4TgABteB7WPiJMgVqq7pt2BgLiD49UPRZZ",
    "applicationName": "Reviewer",
    "description": "Tool to review media"
}
Updating the details of an application that was previously registered
If you wish to subsequently update the name or description of an application that has already been registered, then you can do so as follows.
URI:
(PUT) http://<authentication-service-host>:18101/api/authentication/applications/{applicationId}
Header:
X-App-Registration-Key: <application registration key, as described above>
Body (JSON):
{
    "applicationName": "<updated application name>",
    "description": "<updated application description>"
}
The response to this endpoint is identical in form to the response to the initial application registration.
Retrieval and deletion
The above endpoint also supports GET and DELETE operations, for retrieving details of or deleting an application
that was previously registered. In these cases no request body payload should be sent.
Once an application has been unregistered via the DELETE method, you will no longer be able to obtain OAuth2 access
tokens using the client ID and client secret for that application.
2. Generating a JWT OAuth2 Access Token
To obtain a token, use the /oauth/token?grant_type=client_credentials (POST) request.
Then you need to send a request to the Authentication service, as follows.
URI:
(POST) http://<authentication-service-host>:18101/oauth/token?grant_type=client_credentials
Header:
You must use Basic Authentication. In the Username field, enter the clientId and in the Password field, enter
the clientSecret. This will generate an Authorization header, which will look something like:
Authorization: Basic YWRlYjcwNTAtNWYwZC00ZDQ0LWI2N2EtNWRmNzk3Mzk2OGRmOk5iNFRnQUJ0ZUI3V1BpSk1nVnFxN3B0MkJnTGlENDlVUFJaWg==
Example response:
{
    "access_token": "eyJhbGciOiJIUzI1NiIsInR5cCI6IkpXVCJ9.eyJzY29wZSI6WyJjbGllbnRfY3JlZGVudGlhbHNfZGVmYXVsdF9zY29wZSJdLCJleHAiOjE2MDAzNTg3ODksImp0aSI6IjVmYjgzMWY3LWY0NjgtNGJmNS04ZWE2LWU4YjJmNTZiMjQwNiIsImNsaWVudF9pZCI6ImFkZWI3MDUwLTVmMGQtNGQ0NC1iNjdhLTVkZjc5NzM5NjhkZiJ9.ryM14lfh5EXTMyb25inyeOO4q7_EMotkT7TZUYVlhdQ",
    "token_type": "bearer",
    "expires_in": 3599,
    "scope": "client_credentials_default_scope",
    "jti": "5fb831f7-f468-4bf5-8ea6-e8b2f56b2406"
}
The access_token field in the response contains the JWT OAuth2 access token that will be needed in the next step.
3. Using the Access Token
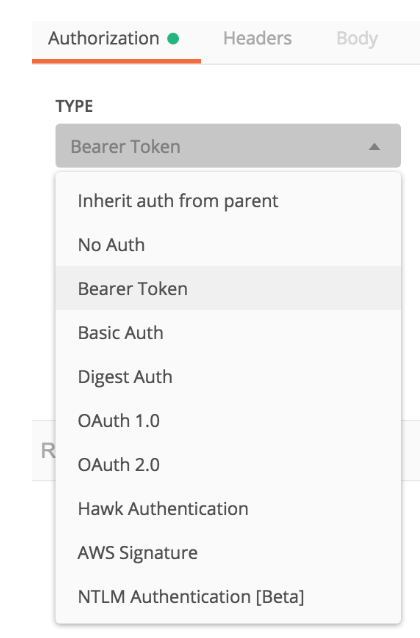
In the API tool of your choice (such as Postman, pictured below), select Bearer Token as the method of authorization. Then enter the JWT OAuth2 access token generated in the previous step.
This will generate an Authorization header, which will look something like:
Authorization: Bearer eyJhbGciOiJIUzI1NiIsInR5cCI6IkpXVCJ9.eyJzY29wZSI6WyJjbGllbnRfY3JlZGVudGlhbHNfZGVmYXVsdF9zY29wZSJdLCJleHAiOjE2MDAzNTg3ODksImp0aSI6IjVmYjgzMWY3LWY0NjgtNGJmNS04ZWE2LWU4YjJmNTZiMjQwNiIsImNsaWVudF9pZCI6ImFkZWI3MDUwLTVmMGQtNGQ0NC1iNjdhLTVkZjc5NzM5NjhkZiJ9.ryM14lfh5EXTMyb25inyeOO4q7_EMotkT7TZUYVlhdQ
Additionally, you must specify the actAsUserId header, providing the ID of the user on whose behalf the API operation
will be performed. See the picture below for an example.

With these headers specified, you can target the main Flex API, e.g.:
(GET) https://wallace.wgtv.ooflex.net/api/assets
All JWT OAuth2 access tokens expire after one hour. After expiry, a new token must be obtained by repeating step (2) above.