SAML authentication
Security Assertion Markup Language (SAML) is an open standard for exchanging authentication and authorisation data between service providers and identity providers. SAML allows you to log into multiple applications, using the same login credentials.
SAML Authentication Flow
The following diagram provides a high level overview of the SAML authentication flow:

Configuring SAML
Warning: When accessing Dalet Flex applications, users within accounts must use a consistent URL style that corresponds to the URLs defined in the identity provider you have chosen to use. For example, for the “oktatest” account:
- Path Based: https://oktatest.qa1.ooyala.net/mam/
- Host Based: https://mam.qa1.ooyala.net/mam/a/oktatest

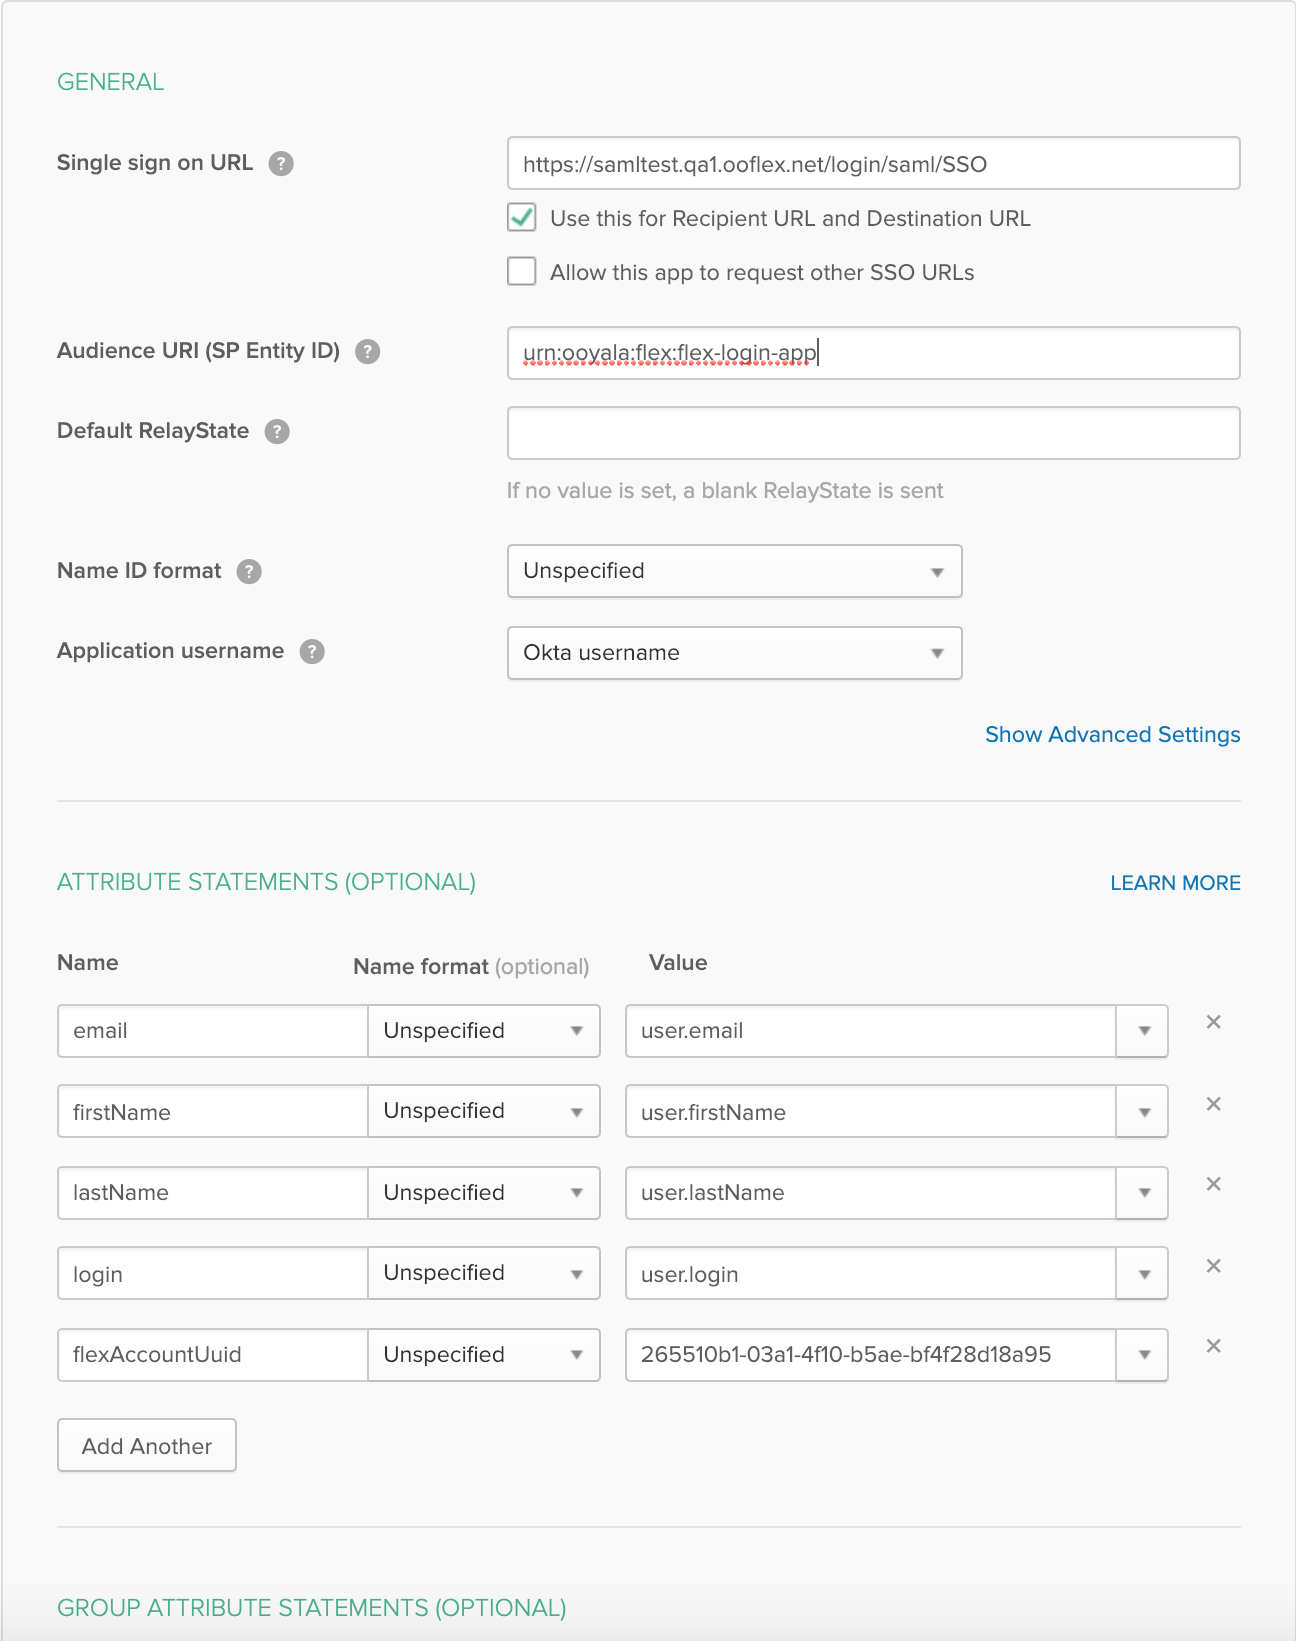
See here for a full list of Single Sign On URLs, Audience Restrictions, and Attribute Statements relating to OKTA, for the different applications.
SAML authentication must be configured in both Dalet Flex Core and in the identity provider that maintains identity information for the users.
The configuration for each identity provider varies, but they share particular characteristics:
- SAML 2 must be enabled.
- A callback URL must be specified, which corresponds to the particular service (FlexMAM, FlexREVIEW and so on) for which you wish to enable SAML.
Notes:
- This guide has been created with the assumption that users have a certain level of familiarity with SAML. Below are the steps for configuring SAML using Auth0 as an example identity provider. Other identity provider services might differ. Where known, we have noted specific configuration differences for other identity providers in the Appendix.
- If you do not have an account with Auth0, visit the Auth0 website in order to create one.
To configure Auth0 as an identity provider
- Log into your Auth0 account and click + New Application.
- In the Name field, enter a name for your application.
- In the Choose application type section, select Regular Web Applications.
- Click Create.
- Click Settings. Scroll down to the Allowed Callback URLs section and add the callback URL that you wish to authenticate against. Examples:
- Path Based: https://account.environment.com/application/saml/SSO
- Host Based: https://application.environment.com/application/saml/SSO
-
Click Save Changes.
-
At the top of the page, click the Add-ons tab.
-
Select SAML2 Web App. In Settings, set the correct JSON.
Example JSON:
{ "audience": "urn:ooyala:flex:flex-operationsdashboard-app", "signResponse": true, "signatureAlgorithm": "rsa-sha256", "digestAlgorithm": "sha256" } { "audience": "urn:ooyala:flex:flex-mam-app", "signResponse": true, "signatureAlgorithm": "rsa-sha256", "digestAlgorithm": "sha256" } -
Click Save.
-
Click Debug and test the JSON. If the JSON is valid, the SAML response will be displayed for the application you have specified.
-
In Show Advanced Settings, click the Endpoints tab. Scroll down to the SAML Metadata URL field and copy the URL.
-
Log into Dalet Flex and create an account. For more information on creating an account, see the Accounts section.
-
On the Account Details page, click the Metadata sub-tab and expand the External Authentication complex. From the Default Role drop down, select a default role. From the Default Owner drop down, select a default owner.
-
Click + to expand the SAML Configuration field. Enter the Application Name of the application to use these SAML settings.
-
IdP Redirect is to specify whether the application login page should redirect to the IdP login page. This should be set to ‘Yes’ or ‘No’.
-
In the SAML IDP Display Name field, enter a display name for the authentication button that will appear on the landing page for the application.
-
In the SAML IDP Metadata URL field, paste the metadata URL obtained from the Advanced Settings section in the SAML UI.
-
Click Save, to save the configuration.
-
Click Enable, to enable the account.
-
Go to the application and check that SAML is enabled. If SAML has been enabled correctly, your custom SAML button is displayed on the login page for the application.
Notes:
- If you have not correctly configured this, the button will still appear on the login page got the application, but it will not function.
- These configuration steps must be repeated for each application within Dalet Flex. For example: FlexMAM, FlexREVIEW, FlexMOVE, Workflow Designer, and so on.
- If IdP Redirect has been selected, the login page for the application will not display, but will instead redirect to the IdP login page.
Keystore Generation
Below you can see the bash script used to add or update a certificate in the keystore. In order to use this script, you must update the IDP_HOST, KEYSTORE_FILE and KEYSTORE_PASSWORD.
  #!/usr/bin/env bash
                  IDP_HOST=flex.authenticationprovider.com
                  IDP_PORT=443
                  CERTIFICATE_FILE=$IDP_HOST.cert
                  KEYSTORE_FILE=samlKeystore.jks
                  KEYSTORE_PASSWORD=nalle123

                  openssl s_client -host $IDP_HOST -port $IDP_PORT -prexit -showcerts </dev/null | sed -ne '/-BEGIN CERTIFICATE-/,/-END CERTIFICATE-/p' > $CERTIFICATE_FILE
                  keytool -delete -alias $IDP_HOST -keystore $KEYSTORE_FILE -storepass $KEYSTORE_PASSWORD
                  keytool -import -alias $IDP_HOST -file $CERTIFICATE_FILE -keystore $KEYSTORE_FILE -storepass $KEYSTORE_PASSWORD -noprompt

                  rm $CERTIFICATE_FILE
Okta Integration
Please refer to the following developer article on the OKTA website, in order to register an Dalet Flex application: https://developer.okta.com/standards/SAML/setting_up_a_saml_application_in_okta
The following advanced settings fields must be specified, if you intend to use OKTA: