Configuring Flex
Creating Metadata Definitions for IMP, PKL and CPL
Before you can use the Import IMP action to import a package asset into Flex Media Platform, you must create three metadata definitions: asset map, PKL, and CPL. When you have created these definitions, you can then run an import action and it will pick up the details in these metadata definitions.
You can create Metadata Definitions using both the REST API and the UI.
Creating Metadata Definitions Using the UI
You can upload the details of each metadata definition in the form of XML files to Flex Media Platform, using the Metadata Designer.
-
In the Metadata Designer, click
 .
. -
From the drop down, click
 .
. -
In the Upload a Metadata Schema window, drag the XML file into the selection area.
-
Click

-
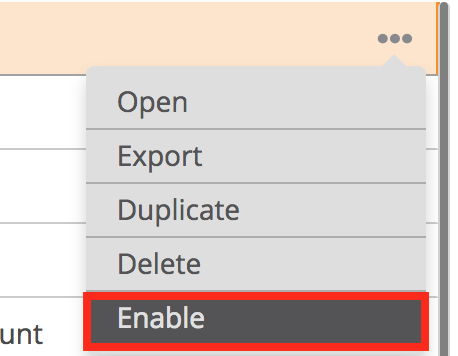
Select the newly uploaded definition.
-
Click Enable and all the fields appear.
Creating an Asset Map Metadata Definition (REST API)
Alternatively you can use the REST API to create the required metadata definitions.
-
Run the following REST request:
POST /api/metadataDefinitions/Example body:
<pre class="pre codeblock hljs json">{ <span class="hljs-attr">"name"</span>: <span class="hljs-string">"imf_am_st0429_9_2007"</span>, <span class="hljs-attr">"description"</span>: <span class="hljs-string">"imf_am_st0429_9_2007"</span>, <span class="hljs-attr">"visibilityIds"</span>: [<span class="hljs-number">4</span>], <span class="hljs-attr">"accountId"</span>: <span class="hljs-number">4</span> }</pre> -
Add the metadata to the asset map metadata definition, using:
PUT:/api/metadataDefinitions/{MetadataDefinitionEntityId}/definition -
Navigate to the definition in the metadata definition and enable it.
Creating a PKL Metadata Definition
-
Run the following REST request:
POST: /api/metadataDefinitions/Example body:
<pre class="pre codeblock hljs json">{ <span class="hljs-attr">"name"</span>: <span class="hljs-string">"imf_pkl_st2067_2_2016"</span>, <span class="hljs-attr">"description"</span>: <span class="hljs-string">"imf_am_st0429_9_2007"</span>, <span class="hljs-attr">"visibilityIds"</span>: [<span class="hljs-number">4</span>], <span class="hljs-attr">"accountId"</span>: <span class="hljs-number">4</span> } </pre> -
Add the metadata to the PKL metadata definition, using:
PUT:/api/metadataDefinitions/{MetadataDefinitionEntityId}/definition -
Navigate to the definition in the metadata definition and enable it.
Creating a CPL Metadata Definition
-
Run the following REST request:
POST:/api/metadataDefinitions/Example body:
<pre class="pre codeblock hljs json"> { <span class="hljs-attr">"name"</span>: <span class="hljs-string">"imf_cpl_st2067_3_2016"</span>, <span class="hljs-attr">"description"</span>: <span class="hljs-string">"imf_am_st0429_9_2007"</span>, <span class="hljs-attr">"visibilityIds"</span>: [<span class="hljs-number">4</span>], <span class="hljs-attr">"accountId"</span>: <span class="hljs-number">4</span> } </pre> -
Add the metadata to the CPL metadata definition, using:
PUT:/api/metadataDefinitions/{MetadataDefinitionEntityId}/definition -
Navigate to the definition in the Metadata Definition and enable it.
Creating and Configuring the IMP Import Action
You must create an IMP Import Action, and then configure it, so that it points to the VFS location where your package resides.
The Import action supports the following protocols:
- FILE
- FTP
- FTPS
- HTTP
- HTTPS
- S3
- SFTP
- SMB
- AZBS (Azure Blob Storage)
- WEBDAV
- In Core, click New.
- From the menu, select Action.
- Enter a name and description for the action.
- In the Visibility field, select the account(s) that the action will be available in.
- From the Plugin Type dropdown, select Import.
- From the Plugin dropdown, select IMP Import.
- Click Save.
- Click the Configuration sub-tab.
- Click Edit.
- In the Source File section, enter the details of the VFS location where your IMP is stored.
- Click Save.
- Click Enable.
Creating a Placeholder IMP Asset
- In Core, click New.
- From the menu, select IMP.
- In the Create new IMP Asset screen, enter a name and description.
- Click Save.
- Click Enable.
Importing a Package
-
On the powerbar above the details screen, click the Import action icon.
-
In the pop-up, select the relevant IMP import action.
-
Click Run. When the progress bar reaches 100%, the package is imported.
-
Click the Details sub-tab, and the contents of the package have been applied to the placeholder, and are now listed as children, below the asset details screen for the IMP asset.
Importing a Supplemental Package
You can update the contents of a package that has already been imported into Flex Media Platform. You can do this by importing new files on top of an existing package in Flex using the IMP Import action.
For example: you might have an existing package in Flex Media Platform, and you want add some new items to it, such a new audio track or a new CPL. This is done using the IMP Import action.
Creating and Configuring the IMP Export Action
You can export the whole package from Flex Media Platform using the following protocols:
- FILE
- FTP
- FTPS
- HTTP
- HTTPS
- S3
- SFTP
- SMB
- WEBDAV
Notes:
- In 7.2.0 you can only export a complete package and not a partial one.
- Azure Blob Storage is currently not supported. You must create an IMP Export Action, and then configure it, so that it points to the VFS location where you would like your package to be exported to.
- In Dalet Flex console, click New and selet Action from the drop down menu.
- Enter a Name and optional Description for the action.
- In the Visibility field, select the account(s) that the action will be available in.
- From the Plugin Type dropdown, select Export.
- From the Plugin dropdown, select IMP Export.
- Click Save.
- Click the Configuration sub-tab.
- Click Edit.
- Enter the details of the VFS location where you would like the IMP to be exported to.
- Click Save.
- Click Enable.
Exporting a Package
- In Dalet Flex console, navigate to the existing IMP asset.
- On the powerbar, click the Export action icon.
- In the pop-up, select the relevant IMP action.
- Click Run. When the progress bar reaches 100%, the supplemental package is exported.