Dalet Flex documentation has moved!
This page is no longer actively maintained. For the latest documentation, please visit us at our new support portal: https://support.dalet.com
Search
FlexMAM’s powerful search functions allow you to search and filter your assets so you can easily find and manage your media. There are several ways to search and filter through you assets, such as free text search, taxonomy exploration, or advanced search with metadata. All these can be used alone or together to further refine your search results.
Using Search
You can perform searches, refine your search criteria, and filter your search results in a number of different ways within FlexMAM.

- Free text search: search terms entered in the search bar are matched across any metadata stored.
- Advanced search: allows you to add filter chips and search operators to refine your free text search.
- Refined search: terms are targeted to match in specific fields only via your table template.
- Taxonomy exploration: drill down based on media categorisation (also adds chips to your advanced search bar).
To use free text search:
- Enter your search criteria in the Search Bar in the Header.
- Hit Enter on your keyboard.
- Your search results will be displayed in the search listing.
You can enter Flex Query Language (FQL) directly into the free text search bar. Learn more about FQL here.
To perform a refined search:
- At a column headed level you can search for terms that relate to specific fields. You can learn how to configure these columns and filters here.
- Hover over the column header and enter your search criteria. You can also use the arrows
 to sort your search results.
 - Results will change dynamically with your search.
To search via taxonomy exploration:
This option is only applicable if you have previously configured taxonomy structure(s) and selected the Display in Apps option. Learn how to create taxonomies in the Metadata Designer here.
- In the left-hand navigation panel there is a taxonomy tree hierarchy with a number of levels.
- Select one or more levels. Selected levels will be highlighted.
- You can now apply search filters in the filter bar and enter a search term in the search bar.
- Your search results will be updated the reflect the matched criteria.
Using Advanced Search
The filter icon to the right of the search bar will allow you to use Advanced Search.

With Advanced Search, you can click Add Filter to create chips that refine your search through available metadata types. You can also select from the following search operators:
- contains
- is
- is not
- starts with
- ends with
- is empty
- is not empty
You can also edit chips you have already created by clicking on the chip to reopen the advanced search menu.
You can use the search operator (ANY (OR), ALL (AND), NONE (NOT)) drop down on the left to configure your search.

ANY will create an OR operator between chips, and ALL will create an AND. These can then be changed via drop down.
When creating your filter, you can select multiple values belonging to the same key to create multiple chips. These chips will be grouped together with brackets. Operators can then be changed between each group to further configure search.

If your number of chips exceeds one line, they will automatically flow onto multiple lines. You can click the icon to expand and collapse your filter chip field.


Using Workspaces with Search
If you have permissions in more than one workspace, you will see the Workspace section in the left navigation panel. Here you can select one or more workspaces to use in conjunction with search to filter your search result/asset list. You can enter a search term in the search bar before applying workspaces as a filter, or you can select your workspaces first, before entering your search term.
To search and filter with workspaces:
- Expand Workspaces in the left panel to see a list of your available workspaces. A list of workspaces you are a member of will be displayed as tree view in the left panel.
- Click on one or more workspaces to select them. Selected workspaces will be highlighted. You can unselect a workspace by clicking on it again.
- Assets in the result list will be filtered down to the assets in the selected workspace(s).
- By default, when no workspace is selected, all assets across all workspaces that you have access to should be searchable.
To view information about workspaces
- Expand Workspaces in the left panel to see a list of your available workspaces.
- As you hover over each workspace, you will see the information icon
 appear.
 - Click the icon and the right hand summary panel will display details about the selected workspace and its members.
Clearing the search will not clear workspace selections.
Table template search
You can use your table template to perform searches. You can apply any number of these to narrow down your results. Applying your table template filters and taxonomy selections also create chips in the search bar.
The below are just some basic examples of filters and how you can use them to sort/filter your search results.
To filter/sort by TYPE:
Click on TYPE and select one or more from the drop down menu.
To filter/sort by ID:
Enter an asset ID to find a specific asset, or use ![]() to sort results by ascending or descending ID numbers.
to sort results by ascending or descending ID numbers.
To filter/sort by NAME:
Enter a name (or a keyword that the name contains) to search for content or use ![]() to sort results by alphabetical order or reverse alphabetical order.
to sort results by alphabetical order or reverse alphabetical order.
To filter/sort by DURATION:
Select Custom in the drop down menu to enter a range in the format HH:MM:SS:FF to filter your results for video assets of a certain length and click the Refine button. You can also select from a list of predefined durations from the drop down menu. Alternatively, you can use ![]() to sort your video/audio assets by length.
to sort your video/audio assets by length.
To filter/sort by CREATED:
Select predefined ranges or specific date ranges to filter your results for assets created within certain time
periods. You can also use ![]() to sort your asset by most to least
recently created.
to sort your asset by most to least
recently created.
- Date: Select from Last hour, Today, Yesterday, Last week and Last month to find assets created within that specific time period. You cannot select more than one.
- Range: Set a date range by selecting a beginning and end date of your choosing from the calendar to find assets created within that specific time period.
Clearing your searches
Clicking the ‘x’ in the search bar will clear your free text search but will not clear your filters.
![]()
Clicking Clear Filters will clear your entire search. This includes your filter chips as well as your free text search in the search bar.
![]()
Using Saved searches
Creating saved searches with a combination of filters of your choice will allow you to easily locate specific assets or types of assets whenever you wish.
To create and use a saved search:
- Once you have filtered by the categories you desire, click Save Search.
- Give your search a relevant name that will help you identify it when you want to use it again next time.
- Select whether you want this Saved Search to be visible to only you or shared with everyone.
- Click Save and it will appear under the My Searches folder under the Activity section in the panel on the left.
- The next time you want to filter by the same combination of categories, simply find it in the My Searches folder and click on it to use it.
To configure ACL permissions for a saved search:
- Find the saved search you want to edit permissions for under My Searches.
- Hover over the saved search and click the
 icon that appears on hover.
 - In the Share tab, you can add and edit permissions for the saved search by adding users or groups to the permission list.
Search Listing
You can display your search results in different views (tile or list), and create templates for each of these views according to your needs and preferences.
-
Clicking on an asset in your search results list will highlight it, indicating that it is selected. Selecting an asset will open the preview panel on the right.
-
Clicking on a marker in your search results list will highlight it, indicating that it is selected. Selecting a marker will open the preview panel for the relevant asset and load the marker tab.
Adjusting your Display Preferences
You can make adjustments to the way your assets and search results are displayed as well as the number of categories you can filter by.
To adjust asset view:
Display your assets according to your preference by toggling between Tile view and List view.
To adjust asset/marker view:
Toggle between Markers View and Asset View to search and view asset or marker results for any query.
Using Table Templates
You can create and apply templates to suit your preferences and needs when sorting and filtering assets within the search listing. Multiple templates can be created and easily switched to ensure that you are viewing the metadata fields that are most important and relevant to your roles and tasks at hand. Those templates can then be shared to other users in the team or remain private. You can edit and delete templates that they created, while other users are able to copy a template and make modifications.
Use the template selection bar to select and apply your desired template  .
.
To create a new table template:
- Click the filter icon on the right of the template selection bar .
- Select New Template from the drop down menu.
- In the New Template window, select whether you want to create a new template for List view, Tile view, or a template for viewing asset markers in the preview panel or manage page. Learn more about metadata markers here.
- Name your template (max. 35 characters).
- Select a Type: Asset
 or Marker
  to select asset or marker metadata to add to your template.
 - The What’s available drop down will allow you to switch between different metadata types: General, technical, basic, etc., and you can select different types of metadata from the table below.
- Click the
 in the left column to add them to the right column.
 - In the Width,PX column set the column width in pixels for each field used in the table template. The value must be greater than 0. If no value is set, a default value is assigned and the value of the column is set to Auto.
- Tick the Share your template? to select whether you want to share your template with other members of your team. This means that they will be able to see and use your template with their own account.
- Click Save when you are happy with your new template.
For tile view templates you can select a maximum of 4 metadata filters, while you can select a maximum of 10 metadata filters for list view.
To manage templates:
- Once you have created a template, you must go to Manage Templates to activate it.
- In the Manage list template window, you can toggle between templates for list view and tile view.
- In the What’s available list, you can see all previously created templates as well as templates created by other users that have been shared with you.
- Add the template(s) you wish to use by clicking . This will move the template to the column on the right, the Activated templates column.
- You can also deactivate templates by clicking
 , moving the template from the right column to the right, meaning that it has been deactivated and you cannot currently use it.
- Click Finish when you are happy with your settings.
To edit a template you created:
- Click the filter icon next to the template selection bar .
- Select Edit Template.
- In the drop down menu, select the template you want to edit.
- You can then edit your template by adding or removing metadata from the What’s available and Your template columns using the and icons.
To copy and edit a template shared with you by another user:
- Click the filter icon next to the template selection bar .
- Select Manage Template.
- In the What’s available column on the left, you can see all available templates, including the ones that other users have created and shared with you.
- Hover over the shared template you wish to edit and click the
 icon.
icon. - This will automatically create a copy of the template. You can now edit the name and metadata fields for this template.
- Click Save.
Using Tile Templates
You can use tile templates to determine what metadata is displayed for different asset types in tile view. While in tile view, you can still use your table template to search and filter your assets.
To create a tile template:
- Click the filter icon on the right of the template selection bar .
- Select New Template from the drop down menu.
- In the New Template window, select the Tile template tab
 .
. - Name your template (max. 35 characters).
- From the drop down menu under What’s available, you can select the category of metadata: General, Technical, etc.
- Click the in the left column to add them to the right column. You can only select a maximum of four metadata types.
- Tick the Share your template? to select whether you want to share your template with other members of your team. This means that they will be able to see and use your template with their own account.
- Click Save when you are happy with your new template.
- Once you have created a template, go to the Tile template tab in Manage Templates.
- Here you will see your tile template in the Activated templates column. The template at the top of the list will be your default tile template.
- From the TYPE drop down menu, you can allocate an asset type for your template: Image, Video, Group, Package. The type you select will apply the template to all assets for the selected asset type when are viewing your assets in Tile View. Metadata for asset types that have not been allocated a template will be displayed with the default template. The first template on the list without a specified asset type will be the default template.
To view your assets in tile view:
- You can view your assets in tile view by clicking the tile view icon
- In the tile view, you can see your asset thumbnails as well as the different metadata template for each asset type.
- You can continue to use your table template to sort and search for assets.
Using Thesaurus with Search
Thesauri can be configured in Metadata Designer to match terms within your search. See here to learn how to use the thesaurus tool to create thesauri in Metadata Designer.
- When you add filters with Advanced search and table headers, terms you type in a Thesaurus field of type tab will be matched with those of your thesaurus (if configured) and you will be presented with a menu of matching terms (ordered alphabetically).
- Once you select the term from the typeahead (or hit ) then the thesaurus icon will be displayed next to the field.
- A sliding Thesaurus panel will appear on the right of the Add Filter window, where you will see a scrollable list of thesaurus suggestions of related terms.
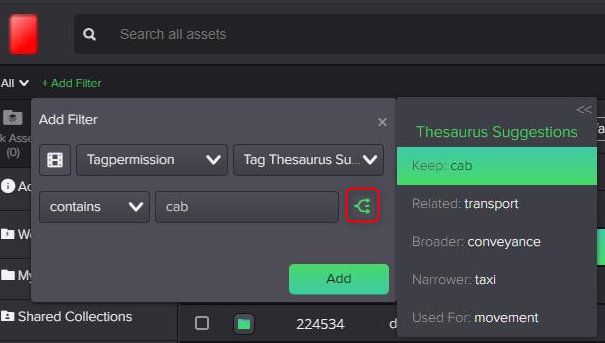
- You can click the highlighted term or type again, or click to select the thesaurus suggestion that you want to use for your search.