Dalet Flex documentation has moved!
This page is no longer actively maintained. For the latest documentation, please visit us at our new support portal: https://support.dalet.com
Additional Information
Manually Setting up FlexCM
Although FlexCM enables you to use specific commands in order to automatically set up repositories and specify your environments respectively, you can also do it manually if you prefer. This requires you to manually create the file structure that is needed, and so, it is recommended that you only perform a manual setup if you are more familiar with the tool.
There are a number of steps that you must carry out. First of all, you will receive FlexCM package via your preferred method of delivery. This package will contain:
- The .jar file
- The miocm-config.yml file
- The environment.yml file.
-
Copy both the .jar file and the miocm-config.yml file into your local home directory. Example: In Windows:
C:\Users\<<Username>>. Below is the format for the miocm-config.yml file:- default Path:
C:\miocm_repos - default Repository:
defaultRepository: mio-Dev-REPO-01
- default Path:
-
Next you must create a working directory in which FlexCM will store Dalet Flex environment configurations, change sets, and logs.
Manually Setting up the Repository
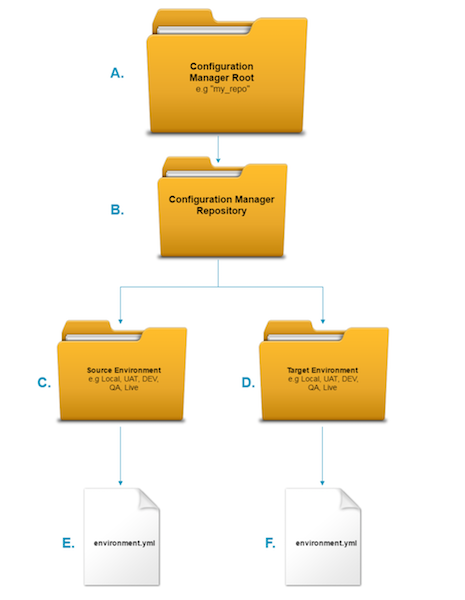
Inside your C:/ drive, create the following folder structure:
Notes:
- You can have any number of environments, within any number of repositories. In the example above, we have shown what the folder structure would look like if you had one repository with only two environments.
- You can use any other path and repository, but you must update the miocm-config.yml file in order for FlexCM to work.
A. Root Folder: This folder represents a workspace in which to manage one or more repositories.
B. Repository: As previously mentioned, you can have multiple repositories. Within each repository you can have two or more environments depending on your needs.
C. Source Environment: This folder represents your source environment. You can make changes and then pull configuration from the source environment.
D. Target Environment: This folder represents the target environment. You can pull configuration from the source environment and apply it to the target environment.
E. environment.yml for Source Environment: This is a .yml file that you place inside your the source environment folder. This must be configured with the details of your source environment, These details are as follows:
- Endpoint: e.g. myenvironment.dalet.com/api
- Password: The password you use to login to the environment
- Name: The name of your environment e.g. my_source_env
- UUID: e.g. c4a1ea01-f42d-4683-8aeb-1cdfdbdf716e
- Username: The username you use to login to the environment
F. environment.yml for Target Environment: This is a .yml file that you place inside your the target environment folder. This must be configured with the details of your target environment. These details are as follows:
- Endpoint: For example: myenvironment.dalet.com/api
- Password: The password you use to login to the environment
- Name: The name of your environment e.g. my_source_env
- UUID: e.g. c4a1ea01-f42d-4683-8aeb-1cdfdbdf716e
- Username: The username you use to login to the environment
Configure each environment manually by opening the enviroment.yml files in a text editor, and adjust the details accordingly. The configuration of the environment .yml files should be as follows:
- name: DevEnv1
- uuid: 47c07ee7-a9f8-46bc-b171-9242540b1435
- endpoint:
https://test-dalet-flex-env.com/api - Username: username
- password: password
Once you apply this configuration to the environment .yml files, you will have a repository with two environments.
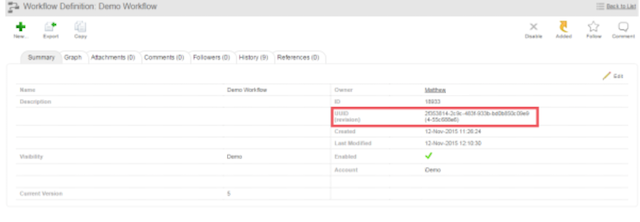
UUID
The UUID (Universally Unique Identifier) is a system defined read-only field. The UUID is generated upon an object’s creation, and so, every object has a UUID.
- UUIDs are returned in the REST API as a JSON property and for existing objects.
- A UUID will be generated when an object is created and it is immutable.
- A UUID can be seen in the Dalet Flex Console, in the Object Details section for that object.
- A UUID will be returned in the configuration object REST API responses.
- A UUID will be used to uniquely identify an object in the REST API URL parameters.
Revision Numbering
A revision number will be generated when an object is created, and it will be updated when the configuration changes are saved.

Example: Any change to the name or description of an object is a new revision version.
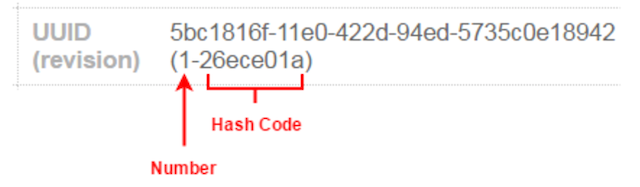
The revision number can be viewed in the Dalet Flex UI, in the Object Details section for a specific object. The revision number will be in the following format:
-
Number: is local to the environment and is a sequentially generated number (0, 1 …N). This number represents the number of updates that have been committed for that specific object in this environment only. FlexCM manages revision changes across multiple environments and warns, as well as prevents committing configuration changes to target environments when the revisions don’t match FlexCM central revision store. Dalet Flex updates the new revision codes for each configuration object. Then, it will maintain the revision code, recalculating it with every change that is made using the UI or FlexCM commit deployment.
-
HashCode: is a unique 32 bit java hash for the object.
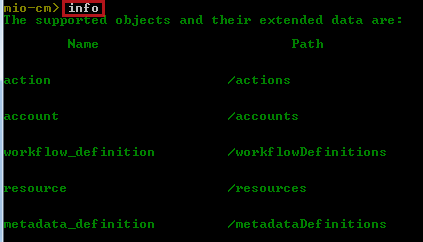
Supported Objects
The objects that FlexCM supports are as follows:
- Action
- Account
- Workflow Definition
- Resource
- Metadata Definition
- Event Handler
- Message Template
- Profile
- Player
- Definition
- Timed Action
- Account
- Property
- Group
- Workspace
- User
- Role
- User Defined Object Type
Once you begin using FlexCM, you can use the info command, in order to list all of the supported object types, as shown below: